Ultimate Intellivision Console
This is a how to setup the Ultimate Intellivision Console!
Get additional information in the INTELLIVSION FORUM.
The Ultimate Intellivision Console is a small portable unit that easily hooks up to your TV and allows you to play all your Intellivision games. What makes this the Ultimate console? All other systems, such as the Intellivision Handhelds and Flashback units, had limitations such as poor emulation, poor sound reproduction, and/or poor video output. The Ultimate console allows you to connect to your TV using an HDMI connection, install all your game images, and use the original controllers including the ECS keyboard, Synthesizer, or any other USB controller.
What is this all about
This video gives you a great overview of why you want to use a Raspberry PI with the Ultimate PC Interface.I want to thank Todd Holcomb for his help, inspiration, and video. CHECK OUT his work on making the Flashback the Ultimate Flashback.
The easy way to configure Retropie
You have installed the Retropie image and do not want to read more?DOWNLOAD for RetorPie 2.6 (last updated 3/11/2015)
DOWNLOAD for RetorPie 3.2.1 (last updated 01/26/2016)
DOWNLOAD for RetorPie 4.2 (last updated 04/05/2017) See version 3.2.1 for a few roms and bios files.
This has been tested with the RetroPie 2.6 R1 image. I expect it to work with the R2 image. In the "boot" folder, you will see "config-r1.txt". You can take setting from this file an apply it to your "config.txt".
- Uncompress the file above.
- Turn on your Raspberry and connect to it with your FTP/SCP program.
- Copy all of the contents from the ZIP file to your Raspberry replacing the files already on your Raspberry.
It is best to login as "root", copy the files without changing the case of the filenames, and set the rights to 7777. Make sure you keep the folder structure intact.
You should now be able to play some games. You will still need to copy over the system files and game files as documented below if you want to play more games.
Your theme will look like the images below.
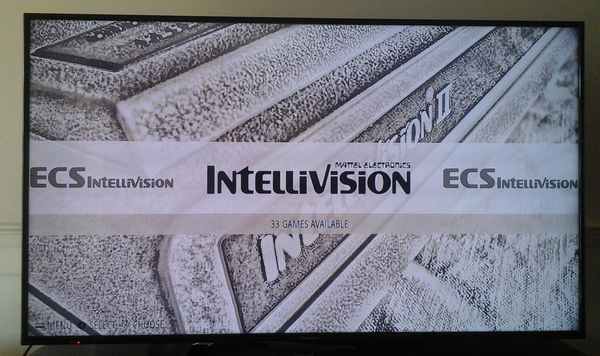
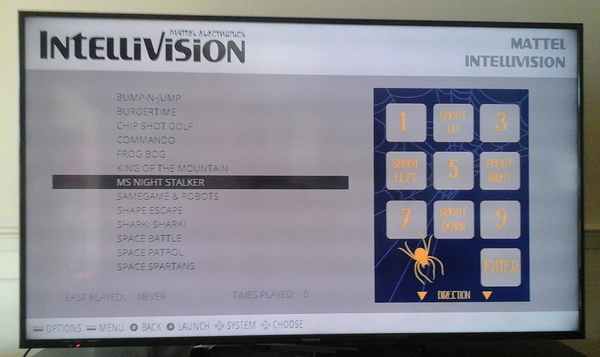
Systems configured in latest package
- A = press top side button on the Intellivision controller
- B = press bottom left side button on the Intellivision controller
- SELECT = press 4 on the keypad
- START = press 5 on the keypad
- PAGE UP = press 7 on the keypad
- PAGE DOWN = press CLR on the keypad
All keys work similar to the console except for the following key combinations:
- PAUSE = press 4 and CLR on the keypad
- RESET = press 5 and 0 (zero) on the keypad
- EXIT = press 6 and ENTER on the keypad
Only joystick #1 is recognized. All keys work similar to the console except for:
- EXIT = press * and # on the Colecovision keypad
- EXIT = press 6 and ENTER on the Intellivision keypad
The disc/joystick and side buttons work similar to the console. Keypad mappings are:
- SELECT = press 1 on the keypad
- START = press 2 on the keypad
- DIFFICULTY A #1 = press 4 on the keypad
- DIFFICULTY B #1 = press 5 on the keypad
- DIFFICULTY A #2 = press 7 on the keypad
- DIFFICULTY B #2 = press 8 on the keypad
- EXIT = press ENTER on the keypad
The disc/joystick and side buttons work on joystick #1. Joystick #2 is used to enter keypad 1 thru 6. Other keys for Joystick #2:
- SELECT = press top side buttons on the Intellivision controller
- # = press bottom left side button on the Intellivision controller
- * = press bottom right side button on the Intellivision controller
- EXIT = press 7 on the keypad
The disc/joystick works similar to the console. Keypad mappings are:
- SELECT = press top side buttons on the Intellivision controller
- BUTTON 1 = press bottom left side button on the Intellivision controller
- EXIT = press ENTER on the keypad
The disc/joystick works similar to the arcade. Keypad mappings are:
- START PLAYER 1 = press 1 on the keypad
- START PLAYER 2 = press 2 on the keypad
- INSERT 1 COIN = press 5 on the keypad
- EXIT = bottom right side button on the Intellivision controller
The disc/joystick works similar to the console.
- EXIT = bottom right side button on the Intellivision controller
The disc/joystick works similar to the console. Keypad mappings are:
- RUN = press 1 on the keypad
- START = press 2 on the keypad
- BUTTON #1 = press top side buton for Intellivision or left side for Colecovision controller
- BUTTON #2 = press bottom left side buton for Intellivision or right side for Colecovision controller
- PAUSE = press CLEAR for Intellivision controller or * for Colecovision controller
- RESET = press 0 for Intellivision and Colecovision controller
- EXIT = press ENTER for Intellivision controller or # for Colecovision controller
The disc/joystick works similar to the console. Keypad mappings are:
- BUTTON = press top side buton for Intellivision or left side for Colecovision controller
- PAUSE = press CLEAR for Intellivision controller or * for Colecovision controller
- RESET = press 0 for Intellivision and Colecovision controller
- EXIT = press ENTER for Intellivision controller or # for Colecovision controller
The disc/joystick works similar to the console. Keypad mappings are:
- BUTTON #1 = press bottom left side buton for Intellivision or right side for Colecovision controller
- BUTTON #2 = press bottom right side buton for Intellivision
- BUTTON #3 = press 1 on the keypad
- BUTTON #4 = press top side buton for Intellivision or left side for Colecovision controller
- PAUSE = press CLEAR for Intellivision controller or * for Colecovision controller
- RESET = press 0 for Intellivision and Colecovision controller
- EXIT = press ENTER for Intellivision controller or # for Colecovision controller
Hardware and Software requirements
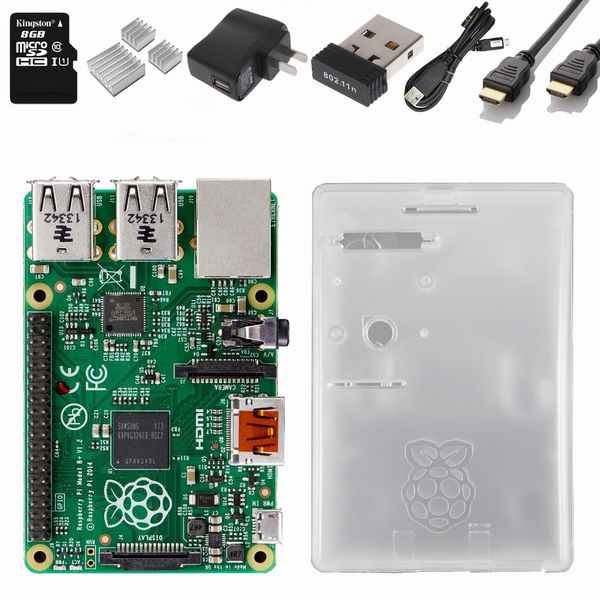
The first thing you need to do is purchase the Required Hardware.- Raspberry PI (I used the B+ model as it has 4 USB ports)
- A/C adaptor - connects to a micro USB jack on the board
- HDMI cable - to connect to the TV input. Make sure your TV has one.
- Micro SD card - to hold all the software. I used an 8GB card.
- Network cable - to connect to your network (more later)
- Ultimate PC Interface - to connect your original Intellivision controllers
- USB Keyboard - used to setup the system. Setup could be done using a remote connection
- USB Wireless Network - an easier way to connect to your network (more later)
- Case - I used a clear case that just fits the Raspberry
- RetroPie - this is a free download and easy to 'install'
- WinSCP
- A terminal application like FireSSH for Firefox
Retropie installation for the 2.3 image
The first thing you need to do is download the RetroPie image. Next is to copy the image to your microSD card. These steps are well documented by others. Please refer to one of the links below for detailed steps. They are both good.Installation process #1. Go up to step 4 (four) and then continue below.
Installation process #2. Go up to step 4 (four) and then continue below.
Additional Configuration
The first thing I suggest to do is *not* hook up to your network with a wire; go wireless! Follow these instructions to configure the wirless network or update the file located at /etc/wpa_supplicant/wpa_supplicant.confIf you purchased your Ultimate PC before 12/01/214, update your Ultimate PC Interface to the latest firmware.
The default resolution for the Intellivision/jzIntv is 1920x1080. Change the resolution by updating the file /etc/emulationstation/es_systems.cfg. If you have a 720 TV, replace the 1920x1080 with 1280x720.